層與層之間的通訊
除了為架構的每個元件定義清晰的職責外,還需要考慮元件如何通訊。這既包括規定通訊規則,也包括元件如何通訊的技術實現。應用程式的架構應該回答以下問題:
- 哪些元件可以與其他哪些元件通訊(包括同類型的元件)?
- 這些元件之間互相暴露哪些輸出?
- 任何給定的層是如何“連線”到另一層的?
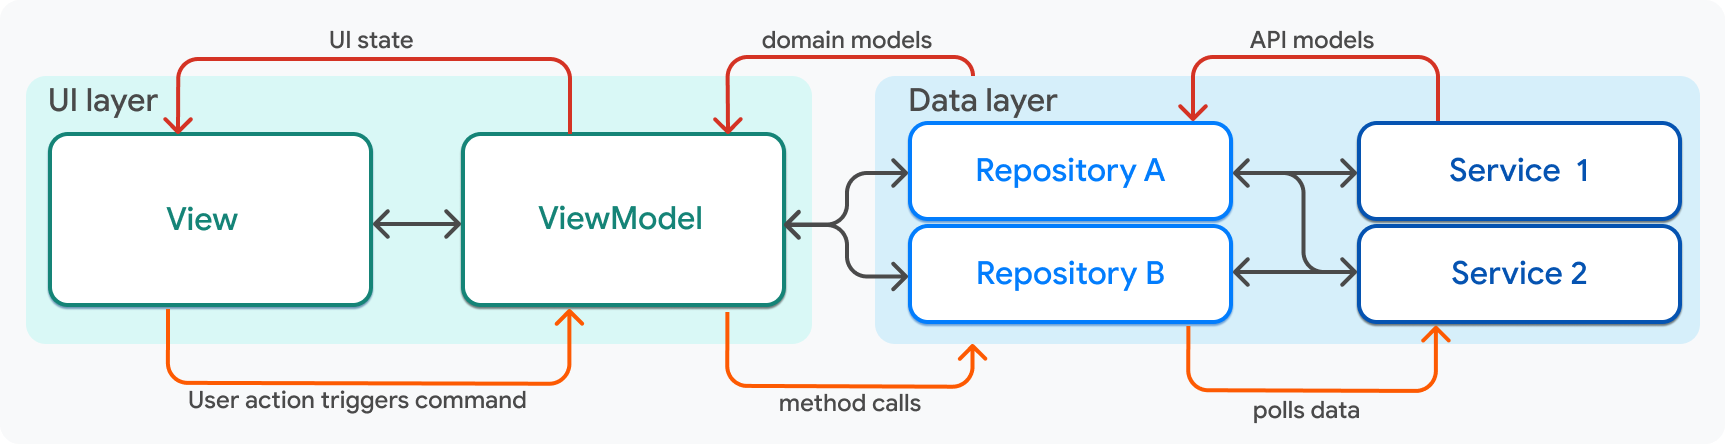
使用此圖作為指南,互動規則如下:
| 元件 | 互動規則 |
|---|---|
| 檢視 (View) |
|
| 檢視模型 (ViewModel) |
|
| 儲存庫 (Repository) |
|
| 服務 (Service) |
|
依賴注入
#本指南展示了這些不同的元件如何透過使用輸入和輸出來相互通訊。在所有情況下,兩個層之間的通訊都透過將一個元件傳遞到(消耗其資料的)元件的建構函式方法中來促進,例如將 Service 傳遞到 Repository 中。
class MyRepository {
  MyRepository({required MyService myService})
          : _myService = myService;

  late final MyService _myService;
}
然而,還有一件事缺失了,那就是物件的建立。在應用程式的哪個地方建立 MyService 例項,以便將其傳遞給 MyRepository?這個問題的答案涉及到一個稱為依賴注入的模式。
在 Compass 應用中,依賴注入 是使用 package:provider 處理的。根據他們構建 Flutter 應用的經驗,Google 的團隊建議使用 package:provider 來實現依賴注入。
服務和儲存庫作為 Provider 物件暴露給 Flutter 應用程式的頂層 Widget 樹。
runApp(
  MultiProvider(
    providers: [
      Provider(create: (context) => AuthApiClient()),
      Provider(create: (context) => ApiClient()),
      Provider(create: (context) => SharedPreferencesService()),
      ChangeNotifierProvider(
        create: (context) => AuthRepositoryRemote(
          authApiClient: context.read(),
          apiClient: context.read(),
          sharedPreferencesService: context.read(),
        ) as AuthRepository,
      ),
      Provider(create: (context) =>
        DestinationRepositoryRemote(
          apiClient: context.read(),
        ) as DestinationRepository,
      ),
      Provider(create: (context) =>
        ContinentRepositoryRemote(
          apiClient: context.read(),
        ) as ContinentRepository,
      ),
      // In the Compass app, additional service and repository providers live here.
    ],
    child: const MainApp(),
  ),
);
服務僅被暴露出來,以便可以透過 provider 中的 BuildContext.read 方法立即注入到儲存庫中,如前面的程式碼片段所示。然後,儲存庫會被暴露出來,以便根據需要注入到檢視模型中。
在 Widget 樹的稍低層級,對應於整個螢幕的檢視模型是在 package:go_router 配置中建立的,其中再次使用 provider 來注入必要的儲存庫。
// This code was modified for demo purposes.
GoRouter router(
  AuthRepository authRepository,
) =>
    GoRouter(
      initialLocation: Routes.home,
      debugLogDiagnostics: true,
      redirect: _redirect,
      refreshListenable: authRepository,
      routes: [
        GoRoute(
          path: Routes.login,
          builder: (context, state) {
            return LoginScreen(
              viewModel: LoginViewModel(
                authRepository: context.read(),
              ),
            );
          },
        ),
        GoRoute(
          path: Routes.home,
          builder: (context, state) {
            final viewModel = HomeViewModel(
              bookingRepository: context.read(),
            );
            return HomeScreen(viewModel: viewModel);
          },
          routes: [
            // ...
          ],
        ),
      ],
);在檢視模型或儲存庫內部,注入的元件應該是私有的。例如,HomeViewModel 類如下所示:
class HomeViewModel extends ChangeNotifier {
  HomeViewModel({
    required BookingRepository bookingRepository,
    required UserRepository userRepository,
  })  : _bookingRepository = bookingRepository,
        _userRepository = userRepository;

  final BookingRepository _bookingRepository;
  final UserRepository _userRepository;

  // ...
}
私有方法可防止具有檢視模型訪問許可權的檢視直接呼叫儲存庫上的方法。
至此,Compass 應用的程式碼演練結束。本頁僅介紹了與架構相關的程式碼,但並未講述全部故事。大部分實用工具程式碼、Widget 程式碼和 UI 樣式都被忽略了。請瀏覽 Compass 應用倉庫中的程式碼,以獲取遵循這些原則構建的健壯 Flutter 應用程式的完整示例。
反饋
#隨著本網站該部分的不斷發展,我們歡迎您的反饋!