持久化儲存架構:SQL
大多數 Flutter 應用程式,無論大小,都可能在某個時候需要在使用者裝置上儲存資料。例如,API 金鑰、使用者偏好設定或應離線可用的資料。
在本示例中,您將學習如何在遵循 Flutter 架構設計模式的 Flutter 應用程式中使用 SQL 整合持久化儲存來處理複雜資料。
要了解如何儲存更簡單的鍵值資料,請檢視 Cookbook 示例:持久化儲存架構:鍵值資料。
閱讀本示例,您應該熟悉 SQL 和 SQLite。如果您需要幫助,可以在閱讀本示例之前先閱讀 使用 SQLite 持久化資料 示例。
本示例使用 sqflite 和 sqflite_common_ffi 外掛,兩者結合支援移動端和桌面端。Web 端支援由實驗性外掛 sqflite_common_ffi_web 提供,但未包含在本示例中。
示例應用程式:待辦事項列表應用程式
#示例應用程式由單個螢幕組成,頂部有一個應用欄,中間有一個專案列表,底部有一個文字輸入欄位。
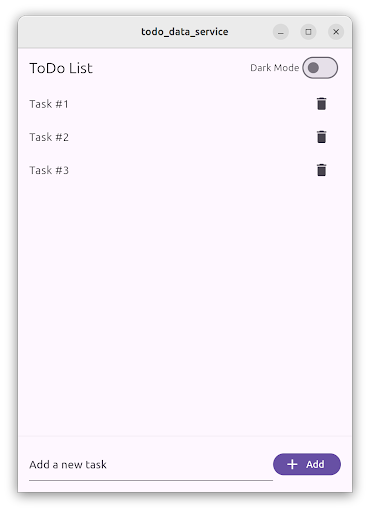
應用程式的主體包含 TodoListScreen。此螢幕包含一個 ListView,其中包含 ListTile 專案,每個專案代表一個待辦事項。在底部,一個 TextField 允許使用者透過輸入任務描述,然後點選“新增”FilledButton 來建立新的待辦事項。
使用者可以點選刪除 IconButton 來刪除待辦事項。
待辦事項列表使用資料庫服務本地儲存,並在使用者啟動應用程式時恢復。
使用 SQL 儲存複雜資料
#此功能遵循推薦的 Flutter 架構設計,包含 UI 層和資料層。此外,在領域層可以找到使用的資料模型。
- UI 層包含
TodoListScreen和TodoListViewModel - 領域層包含
Todo資料類 - 資料層包含
TodoRepository和DatabaseService
待辦事項列表表示層
#TodoListScreen 是一個 Widget,負責顯示和建立待辦事項的 UI。它遵循 MVVM 模式,並由 TodoListViewModel 伴隨,後者包含待辦事項列表和三個命令:載入、新增和刪除待辦事項。
此螢幕分為兩部分:一部分包含待辦事項列表,使用 ListView 實現;另一部分是用於建立新待辦事項的 TextField 和 Button。
ListView 被 ListenableBuilder 包裹,它監聽 TodoListViewModel 的變化,併為每個待辦事項顯示一個 ListTile。
ListenableBuilder(
  listenable: widget.viewModel,
  builder: (context, child) {
    return ListView.builder(
      itemCount: widget.viewModel.todos.length,
      itemBuilder: (context, index) {
        final todo = widget.viewModel.todos[index];
        return ListTile(
          title: Text(todo.task),
          trailing: IconButton(
            icon: const Icon(Icons.delete),
            onPressed: () => widget.viewModel.delete.execute(todo.id),
          ),
        );
      },
    );
  },
)
待辦事項列表定義在 TodoListViewModel 中,並透過 load 命令載入。此方法呼叫 TodoRepository 並獲取待辦事項列表。
List<Todo> _todos = [];

List<Todo> get todos => _todos;

Future<Result<void>> _load() async {
  try {
    final result = await _todoRepository.fetchTodos();
    switch (result) {
      case Ok<List<Todo>>():
        _todos = result.value;
        return Result.ok(null);
      case Error():
        return Result.error(result.error);
    }
  } on Exception catch (e) {
    return Result.error(e);
  } finally {
    notifyListeners();
  }
}
按下 FilledButton 會執行 add 命令,並將文字控制器中的值傳遞進去。
FilledButton.icon(
  onPressed: () =>
      widget.viewModel.add.execute(_controller.text),
  label: const Text('Add'),
  icon: const Icon(Icons.add),
)然後,add 命令呼叫 TodoRepository.createTodo() 方法,並傳入任務描述文字,從而建立一個新的待辦事項。
createTodo() 方法返回新建立的待辦事項,然後將其新增到檢視模型中的 _todo 列表中。
待辦事項包含由資料庫生成的唯一識別符號。這就是為什麼檢視模型不建立待辦事項,而是由 TodoRepository 建立的原因。
Future<Result<void>> _add(String task) async {
  try {
    final result = await _todoRepository.createTodo(task);
    switch (result) {
      case Ok<Todo>():
        _todos.add(result.value);
        return Result.ok(null);
      case Error():
        return Result.error(result.error);
    }
  } on Exception catch (e) {
    return Result.error(e);
  } finally {
    notifyListeners();
  }
}最後,TodoListScreen 也監聽 add 命令的結果。當操作完成時,TextEditingController 會被清空。
void _onAdd() {
  // Clear the text field when the add command completes.
  if (widget.viewModel.add.completed) {
    widget.viewModel.add.clearResult();
    _controller.clear();
  }
}
當用戶點選 ListTile 中的 IconButton 時,會執行 delete 命令。
IconButton(
  icon: const Icon(Icons.delete),
  onPressed: () => widget.viewModel.delete.execute(todo.id),
)
然後,檢視模型呼叫 TodoRepository.deleteTodo() 方法,並傳入唯一的待辦事項識別符號。操作成功會從檢視模型和螢幕中移除待辦事項。
Future<Result<void>> _delete(int id) async {
  try {
    final result = await _todoRepository.deleteTodo(id);
    switch (result) {
      case Ok<void>():
        _todos.removeWhere((todo) => todo.id == id);
        return Result.ok(null);
      case Error():
        return Result.error(result.error);
    }
  } on Exception catch (e) {
    return Result.error(e);
  } finally {
    notifyListeners();
  }
}
待辦事項列表領域層
#本示例應用程式的領域層包含 Todo 專案資料模型。
專案由一個不可變的資料類表示。在這種情況下,應用程式使用 freezed 包來生成程式碼。
該類有兩個屬性:一個由 int 表示的 ID,以及一個由 String 表示的任務描述。
@freezed
abstract class Todo with _$Todo {
  const factory Todo({
    /// The unique identifier of the Todo item.
    required int id,

    /// The task description of the Todo item.
    required String task,
  }) = _Todo;
}
待辦事項列表資料層
#此功能的 資料層由兩個類組成:TodoRepository 和 DatabaseService。
TodoRepository 是所有待辦事項的真相來源。檢視模型必須使用此儲存庫來訪問待辦事項列表,並且它不應暴露任何有關它們如何儲存的實現細節。
在內部,TodoRepository 使用 DatabaseService,它使用 sqflite 包實現對 SQL 資料庫的訪問。您可以使用其他儲存包,如 sqlite3、drift,甚至雲端儲存解決方案,如 firebase_database 來實現相同的 DatabaseService。
TodoRepository 在每次請求之前都會檢查資料庫是否已開啟,並在必要時開啟它。
它實現了 fetchTodos()、createTodo() 和 deleteTodo() 方法。
class TodoRepository {
  TodoRepository({required DatabaseService database}) : _database = database;

  final DatabaseService _database;

  Future<Result<List<Todo>>> fetchTodos() async {
    if (!_database.isOpen()) {
      await _database.open();
    }
    return _database.getAll();
  }

  Future<Result<Todo>> createTodo(String task) async {
    if (!_database.isOpen()) {
      await _database.open();
    }
    return _database.insert(task);
  }

  Future<Result<void>> deleteTodo(int id) async {
    if (!_database.isOpen()) {
      await _database.open();
    }
    return _database.delete(id);
  }
}
DatabaseService 使用 sqflite 包實現對 SQLite 資料庫的訪問。
最好將表名和列名定義為常量,以避免在編寫 SQL 程式碼時出現拼寫錯誤。
static const String _todoTableName = 'todo';
static const String _idColumnName = '_id';
static const String _taskColumnName = 'task';
open() 方法開啟現有資料庫,如果不存在則建立一個新資料庫。
Future<void> open() async {
  _database = await databaseFactory.openDatabase(
    join(await databaseFactory.getDatabasesPath(), 'app_database.db'),
    options: OpenDatabaseOptions(
      onCreate: (db, version) {
        return db.execute(
          'CREATE TABLE $_todoTableName($_idColumnName INTEGER PRIMARY KEY AUTOINCREMENT, $_taskColumnName TEXT)',
        );
      },
      version: 1,
    ),
  );
}請注意,id 列被設定為 primary key 和 autoincrement;這意味著每個新插入的專案都會為其 id 列分配一個新值。
insert() 方法在資料庫中建立一個新的待辦事項,並返回一個新建立的 Todo 例項。id 如前所述生成。
Future<Result<Todo>> insert(String task) async {
  try {
    final id = await _database!.insert(_todoTableName, {
      _taskColumnName: task,
    });
    return Result.ok(Todo(id: id, task: task));
  } on Exception catch (e) {
    return Result.error(e);
  }
}
所有 DatabaseService 操作都使用 Result 類來返回值,正如 Flutter 架構建議 所推薦的那樣。這有助於在應用程式程式碼的後續步驟中處理錯誤。
getAll() 方法執行資料庫查詢,獲取 id 和 task 列中的所有值。對於每個條目,它會建立一個 Todo 類例項。
Future<Result<List<Todo>>> getAll() async {
  try {
    final entries = await _database!.query(
      _todoTableName,
      columns: [_idColumnName, _taskColumnName],
    );
    final list = entries
        .map(
          (element) => Todo(
            id: element[_idColumnName] as int,
            task: element[_taskColumnName] as String,
          ),
        )
        .toList();
    return Result.ok(list);
  } on Exception catch (e) {
    return Result.error(e);
  }
}
delete() 方法根據待辦事項 id 執行資料庫刪除操作。
在這種情況下,如果未刪除任何專案,則會返回一個錯誤,表明出現了問題。
Future<Result<void>> delete(int id) async {
  try {
    final rowsDeleted = await _database!.delete(
      _todoTableName,
      where: '$_idColumnName = ?',
      whereArgs: [id],
    );
    if (rowsDeleted == 0) {
      return Result.error(Exception('No todo found with id $id'));
    }
    return Result.ok(null);
  } on Exception catch (e) {
    return Result.error(e);
  }
}整合所有概念
#在應用程式的 main() 方法中,首先初始化 DatabaseService,它在不同平臺上需要不同的初始化程式碼。然後,將新建立的 DatabaseService 傳遞給 TodoRepository,後者本身作為建構函式引數依賴項傳遞給 MainApp。
void main() {
  late DatabaseService databaseService;
  if (kIsWeb) {
    throw UnsupportedError('Platform not supported');
  } else if (Platform.isLinux || Platform.isWindows || Platform.isMacOS) {
    // Initialize FFI SQLite
    sqfliteFfiInit();
    databaseService = DatabaseService(databaseFactory: databaseFactoryFfi);
  } else {
    // Use default native SQLite
    databaseService = DatabaseService(databaseFactory: databaseFactory);
  }

  runApp(
    MainApp(
      // ···
      todoRepository: TodoRepository(database: databaseService),
    ),
  );
}
然後,在建立 TodoListScreen 時,也建立 TodoListViewModel 並將其 TodoRepository 作為依賴項傳遞給它。
TodoListScreen(
  viewModel: TodoListViewModel(todoRepository: widget.todoRepository),
)